Recently I participated in a Kaggle computer vision competition which included multi-label image classification problem. Here is the link to Kaggle competition: https://www.kaggle.com/c/bengaliai-cv19
Here’s a brief description about the competition: We were supposed to classify given Bengali graphemes components (similar to English phonemes) into one of 186 classes (168 grapheme root, 11 vowel diacritics and 7 consonant diacritics). Every image will have three components and we were supposed to identify these three components in the given image.
So as you can see, this is a multi-label classification problem (Each image with 3 labels). To address these type of problems using CNNs, there are following two ways:
- Create 3 separate models, one for each label.
- Create a single CNN with multiple outputs.
Let’s first see why creating separate models for each label is not a feasible approach. When we create separate models, almost all the layers will be the same except the last one or two layers. So the training time will be very high (if a single model takes $x$ time, then $n$ separate models will take $n * x$ time).
Now let’s explore CNN with multiple outputs in detail.
Here is high level diagram explaining how such CNN with three output looks like:
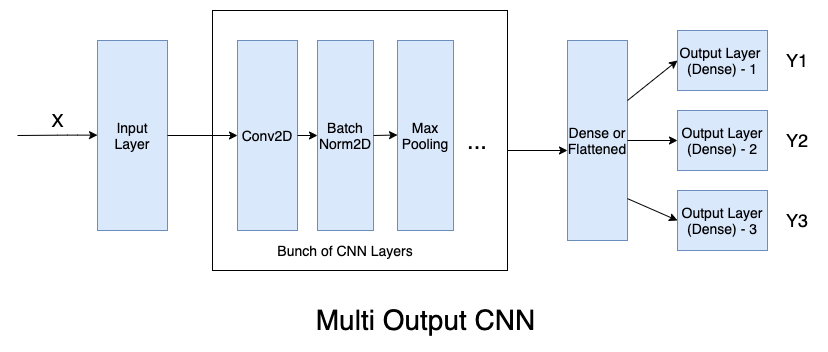
As you can see in above diagram, CNN takes a single input `X` (Generally with shape (m, channels, height, width) where m is batch size) and spits out three outputs (here Y2, Y2, Y3 generally with shape (m, n_classes) again m is batch size).
For each output, we can specify a separate name, callback function (for example learning rate annealer), activation function, even the loss function and metrics. Now let’s see how to implement all these using Keras.
Let’s first create a basic CNN model with a few Convolutional and Pooling layers.
# Necessary imports
%tensorflow_version 1.x
from tensorflow import keras
from keras.layers import Dense,Conv2D,Flatten,MaxPool2D,Dropout,BatchNormalization, Input
from keras.optimizers import Adam
from keras.callbacks import ReduceLROnPlateau
from keras.models import ModelIMG_SIZE = 64
inputs = Input(shape = (IMG_SIZE, IMG_SIZE, 1))
model = Conv2D(filters=32, kernel_size=(3, 3), padding='SAME', activation='relu', input_shape=(IMG_SIZE, IMG_SIZE, 1))(inputs)
model = Conv2D(filters=32, kernel_size=(3, 3), padding='SAME', activation='relu')(model)
model = BatchNormalization(momentum=0.15)(model)
model = MaxPool2D(pool_size=(2, 2))(model)
model = Conv2D(filters=32, kernel_size=(5, 5), padding='SAME', activation='relu')(model)
model = Dropout(rate=0.3)(model)
model = Conv2D(filters=256, kernel_size=(3, 3), padding='SAME', activation='relu')(model)
model = BatchNormalization(momentum=0.15)(model)
model = MaxPool2D(pool_size=(2, 2))(model)
model = Conv2D(filters=256, kernel_size=(5, 5), padding='SAME', activation='relu')(model)
model = BatchNormalization(momentum=0.15)(model)
model = Dropout(rate=0.3)(model)
model = Flatten()(model)
model = Dense(1024, activation = "relu")(model)
model = Dropout(rate=0.3)(model)
dense = Dense(512, activation = "relu")(model)
head_root = Dense(168, activation = 'softmax', name='output_root')(dense)
head_vowel = Dense(11, activation = 'softmax', name='output_vowel')(dense)
head_consonant = Dense(7, activation = 'softmax', name='output_consonant')(dense)
model = Model(inputs=inputs, outputs=[head_root, head_vowel, head_consonant])In the last layer, notice that all the three outputs (with name "output_root", "output_vowel", "output_consonant") have a common input, which is the last flatten/dense layer. We can see these layer connections by printing model summary as following:
model.summary()Model: "model_1" __________________________________________________________________________________________________ Layer (type) Output Shape Param # Connected to ================================================================================================== input_1 (InputLayer) (None, 64, 64, 1) 0 __________________________________________________________________________________________________ conv2d_1 (Conv2D) (None, 64, 64, 32) 320 input_1[0][0] __________________________________________________________________________________________________ conv2d_2 (Conv2D) (None, 64, 64, 32) 9248 conv2d_1[0][0] __________________________________________________________________________________________________ batch_normalization_1 (BatchNor (None, 64, 64, 32) 128 conv2d_2[0][0] __________________________________________________________________________________________________ max_pooling2d_1 (MaxPooling2D) (None, 32, 32, 32) 0 batch_normalization_1[0][0] __________________________________________________________________________________________________ conv2d_3 (Conv2D) (None, 32, 32, 32) 25632 max_pooling2d_1[0][0] __________________________________________________________________________________________________ dropout_1 (Dropout) (None, 32, 32, 32) 0 conv2d_3[0][0] __________________________________________________________________________________________________ conv2d_4 (Conv2D) (None, 32, 32, 256) 73984 dropout_1[0][0] __________________________________________________________________________________________________ batch_normalization_2 (BatchNor (None, 32, 32, 256) 1024 conv2d_4[0][0] __________________________________________________________________________________________________ max_pooling2d_2 (MaxPooling2D) (None, 16, 16, 256) 0 batch_normalization_2[0][0] __________________________________________________________________________________________________ conv2d_5 (Conv2D) (None, 16, 16, 256) 1638656 max_pooling2d_2[0][0] __________________________________________________________________________________________________ batch_normalization_3 (BatchNor (None, 16, 16, 256) 1024 conv2d_5[0][0] __________________________________________________________________________________________________ dropout_2 (Dropout) (None, 16, 16, 256) 0 batch_normalization_3[0][0] __________________________________________________________________________________________________ flatten_1 (Flatten) (None, 65536) 0 dropout_2[0][0] __________________________________________________________________________________________________ dense_1 (Dense) (None, 1024) 67109888 flatten_1[0][0] __________________________________________________________________________________________________ dropout_3 (Dropout) (None, 1024) 0 dense_1[0][0] __________________________________________________________________________________________________ dense_2 (Dense) (None, 512) 524800 dropout_3[0][0] __________________________________________________________________________________________________ output_root (Dense) (None, 168) 86184 dense_2[0][0] __________________________________________________________________________________________________ output_vowel (Dense) (None, 11) 5643 dense_2[0][0] __________________________________________________________________________________________________ output_consonant (Dense) (None, 7) 3591 dense_2[0][0] ================================================================================================== Total params: 69,480,122 Trainable params: 69,479,034 Non-trainable params: 1,088 __________________________________________________________________________________________________
Now let's compile our model by providing the loss function, optimizer and metrics. Here I'll use the same loss function for all the outputs but multiple loss functions can be used for each outputs by passing the list of loss functions.
model.compile(optimizer='adam', loss='categorical_crossentropy', metrics=['accuracy'])Till this point, it was straightforward as many low level details are abstracted by Keras. But now we can not simply use "model.fit(X, Y)" because now we have multiple $Y_i$s for each $X_i$s. So we need to create a custom training data generator which generates the data in the form Keras expects it. Let's first see the data format expected by Keras.
As there is a single input, the data format for $X$ remains as it is: $(m, C, H, W)$, where $m$ is batch size. However because of multiple outputs, Keras expects a dict having output layer names as it's keys and the corresponding labels are it's values.
Y = {
    'output_root': [Array of shape (m, n_classes_root)],
    'output_vowel': [Array of shape (m, n_classes_vowel)],
    'output_consonant': [Array of shape (m, n_classes_consonent)]
}
Generally, it's also required to use image augmentations to reduce overfitting (a regularization technique). For this, in Keras we use ImageDataGenerator Class to preprocess the training images. Now in our case, we want both: Image augmentations as well as multiple outputs. So let's override the "flow()" method of "ImageDataGenerator" Class and create our own custom ImageDataGenerator Class. Here's how:
# Extend to "ImageDataGenerator" class in order to override it's flow() method.
# By default it generates batches of single input-output: https://keras.io/preprocessing/image/
class MultiOutputDataGenerator(keras.preprocessing.image.ImageDataGenerator):

    def flow(self,
             x,
             y=None,
             batch_size=32,
             shuffle=True,
             sample_weight=None,
             seed=None,
             save_to_dir=None,
             save_prefix='',
             save_format='png',
             subset=None):

        targets = None
        target_lengths = {}
        ordered_outputs = []
        for output, target in y.items():
            if targets is None:
                targets = target
            else:
                targets = np.concatenate((targets, target), axis=1)
            target_lengths[output] = target.shape[1]
            ordered_outputs.append(output)


        for flowx, flowy in super().flow(x, targets, batch_size=batch_size,
                                         shuffle=shuffle):
            target_dict = {}
            i = 0
            for output in ordered_outputs:
                target_length = target_lengths[output]
                target_dict[output] = flowy[:, i: i + target_length]
                i += target_length

            yield flowx, target_dict
This class extends the Keras "ImageDataGenerator" class and just overrides the flow() method. All other complexities (like image augmentation, shuffling etc.) are still taken care by the super class itself. Now, let's see how to use this class and generate the training data which is compatible with keras' fit_generator() method. (fit_generator() is used when you have a python generator instead of a loop creating batches of training data).
# Data augmentation for creating more training data
datagen = MultiOutputDataGenerator(
    featurewise_center=False,  # set input mean to 0 over the dataset
    samplewise_center=False,  # set each sample mean to 0
    featurewise_std_normalization=False,  # divide inputs by std of the dataset
    samplewise_std_normalization=False,  # divide each input by its std
    zca_whitening=False,  # apply ZCA whitening
    rotation_range=8,  # randomly rotate images in the range (degrees, 0 to 180)
    zoom_range = 0.15, # Randomly zoom image
    width_shift_range=0.15,  # randomly shift images horizontally (fraction of total width)
    height_shift_range=0.15,  # randomly shift images vertically (fraction of total height)
    horizontal_flip=False,  # randomly flip images
    vertical_flip=False)  # randomly flip images


# This will just calculate parameters required to augment the given data. This won't perform any augmentations
datagen.fit(x_train)

 # Fit the model
history = model.fit_generator(datagen.flow(x_train, {'output_root': y_train_root, 'output_vowel': y_train_vowel, 'output_consonant': y_train_consonant}, batch_size=batch_size),
                          epochs = epochs, validation_data = (x_test, [y_test_root, y_test_vowel, y_test_consonant]),
                          steps_per_epoch=x_train.shape[0] // batch_size,
                          callbacks=[learning_rate_reduction_root, learning_rate_reduction_vowel, learning_rate_reduction_consonant])
Note: Make sure that the keys used in calling flow() method should be same as the names of output layers of your model (here: output_root, output_vowel etc.).
That's it! Now you know how to train multi-output CNNs using Keras. For complete implementation details, refere my Kaggle kernel in which I have trained such a CNN: https://www.kaggle.com/kaushal2896/bengali-graphemes-starter-eda-multi-output-cnn
Reference:
- https://keras.io/models/model/
- https://www.kaggle.com/kaushal2896/bengali-graphemes-starter-eda-multi-output-cnn