General Concepts
- Containers are like running docker images and images are like stopped docker containers (just a terminology). Docker images are like a class and containers are like the instances of that class. In other words, docker images are templates.
- Docker Engine is a server client application. When docker engine is installed, both docker client and docker daemon are installed. So when a user hits commands like “docker run”, client makes API calls to daemon (which implements the docker remote API) and the daemon does all the heavy lifting like pulling the image from docker hub if image doesn’t exist on host, starting the containers etc.
- Docker client and daemon can be on different locations.
- Docker containers don’t have their own kernel, they use the kernel of the host OS and that’s why linux containers run on linux OS and windows containers run on windows only.
What is Docker Container?
Isolated area of an OS with resource usage limits applied.
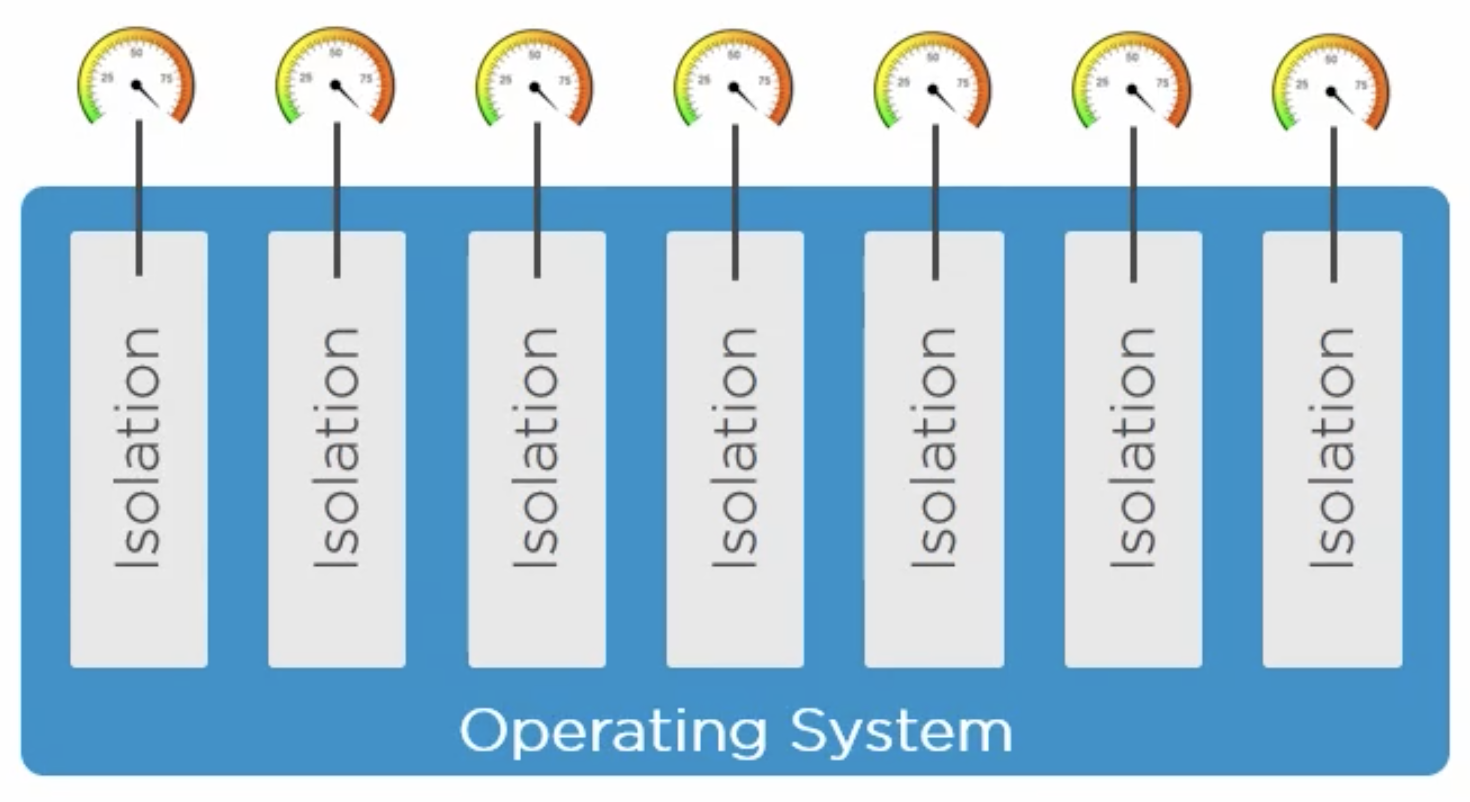
There are two main building blocks of containers: Namespaces and cgroups (Control Groups).
What are Namespaces and Control Groups?
Namespaces are used for creating isolation on OS and control groups are all about setting limits and grouping objects. They both are linux kernel primitives (also in Windows now). Because of isolation, containers are not aware of each other even if they are running on the same host OS.
Following is the Linux namespace:
- Process ID (pid) (process ID table with pid1-the process which starts at boot time). What is pid1 in linux? https://unix.stackexchange.com/questions/369835/replacing-pid-1-in-linux
- Network (net) (IP-address etc.)
- Filesystem/mount (mnt) (Root file system)
- Inter-proc comm (ipc)
- UTS (uts)
- User (user)
Each container has its own isolated namespace. In isolated namespace, each container has its own isolated process tree with pid1, network stack, file system with root (“/” in linux, “C:\” in windows), IPC (process from single container has same shared memory space but isolated from processes from other containers), own hostname (via UTS) and user namespaces.
Now, when there are many isolated containers on a single host OS, there might be a problem of resource crunch (One container using too many resources (memory, disk space etc.)). To limit the resources each container uses, Control Groups are used.
Combining layered file system, namespaces and cgroups, containers can be created.
Difference between docker containers and Virtual Machines: https://stackoverflow.com/questions/16047306/how-is-docker-different-from-a-virtual-machine
Details of Docker Engine
This is how docker architecture looks like:
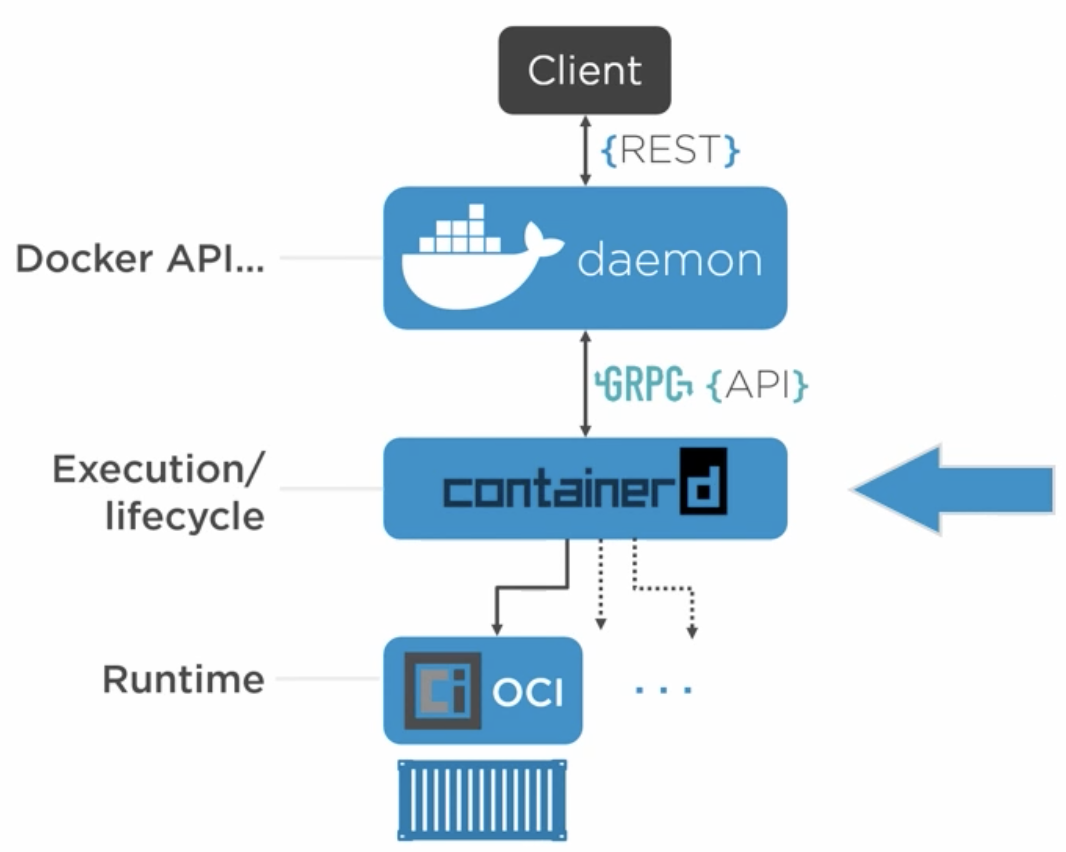
We interact with docker client via CLI (or UI) and it makes API calls to docker daemon, which implements these APIs and listens for docker client. ContainerD handles execution/lifecycle operations like start, stop, pause and unpause. OCI (Open Container Initiative) layer does the interface with the kernel.
The reason why docker daemon and containerD are decoupled is that when docker daemon is restarted, it won’t affect any of the running containers. This is a super useful feature when we’re using docker in production. Docker can be upgraded to new versions without killing any of the running docker containers. After upgrade/restart, containerD rediscovers the running containers and connects with its shim process again.
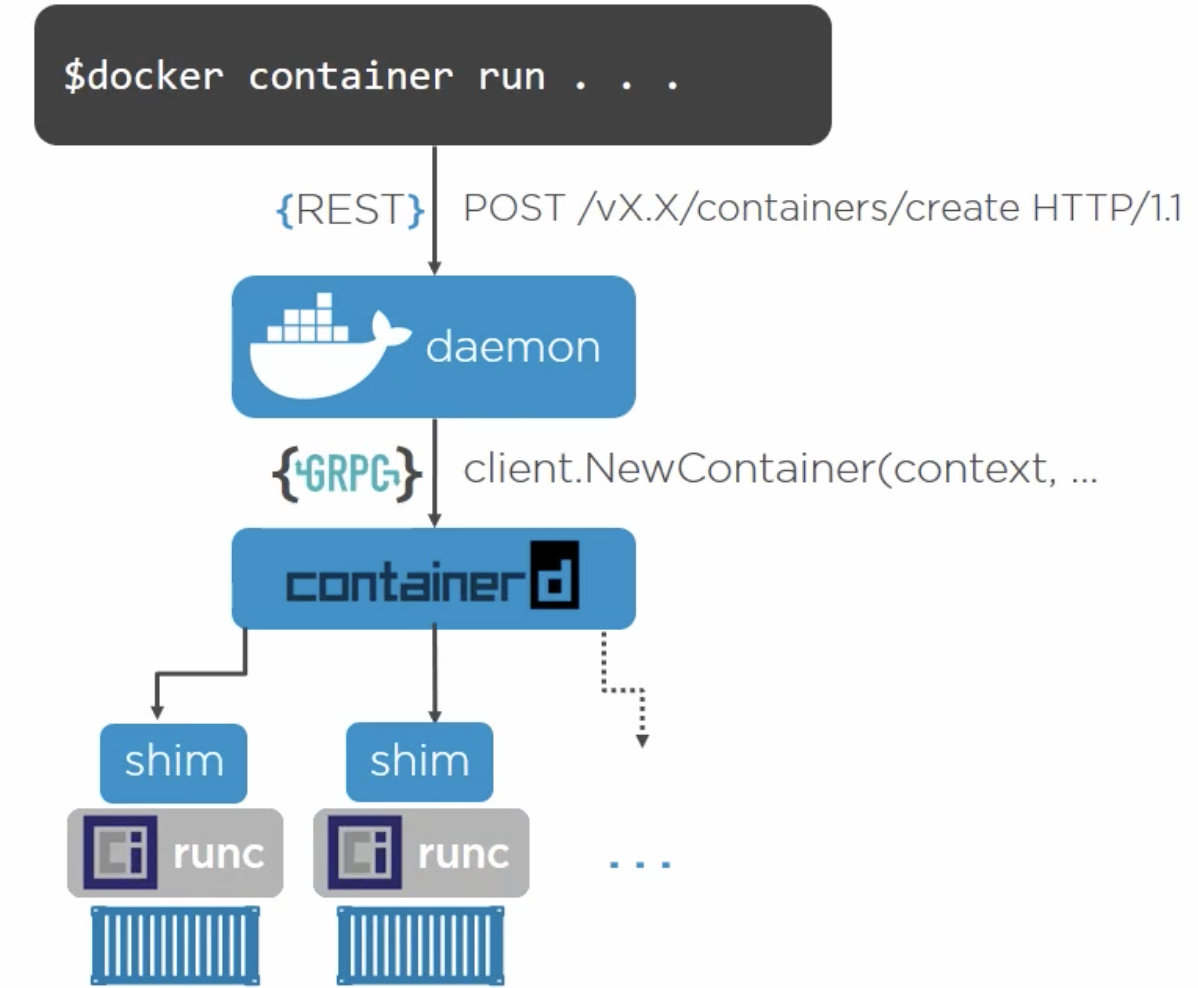
What happens under the hood when we create a new container on Linux?
When the command is fired from CLI by the user, it makes an API call to the docker daemon, which then calls containerD via GRPC, which further calls shim process and runC. RunC spins up the container and exits, however shim remains connected to the container. This is also the case when multiple containers are spun up.
Docker Images Explained in Depth
- Docker image is a read only template for creating application containers. Inside an image, there is all the code of the application, dependencies and the minimal OS to run the application. There’s also a manifest JSON, explaining how all fits together (like information about layers, ID, tags etc.).
- Images are build time constructs and containers are run time constructs. (Image is similar to class(template/blueprint) and container is similar to class instance).
- Image has a layered file system and contains a bunch of layers and not a single blob. Every layer is a bunch of files and objects.
- From a single image, multiple containers can be started/run.
- Images are stored in a registry (default registry is docker-hub), which can be cloud or on-prem.
- As mentioned earlier, images are read only but there is a thin writable layer for each container, where they can write/update content if required.
- The layers of docker images are independent to each other. All the details of combining the layers to create a separate image is mentioned in the manifest JSON file of the image.
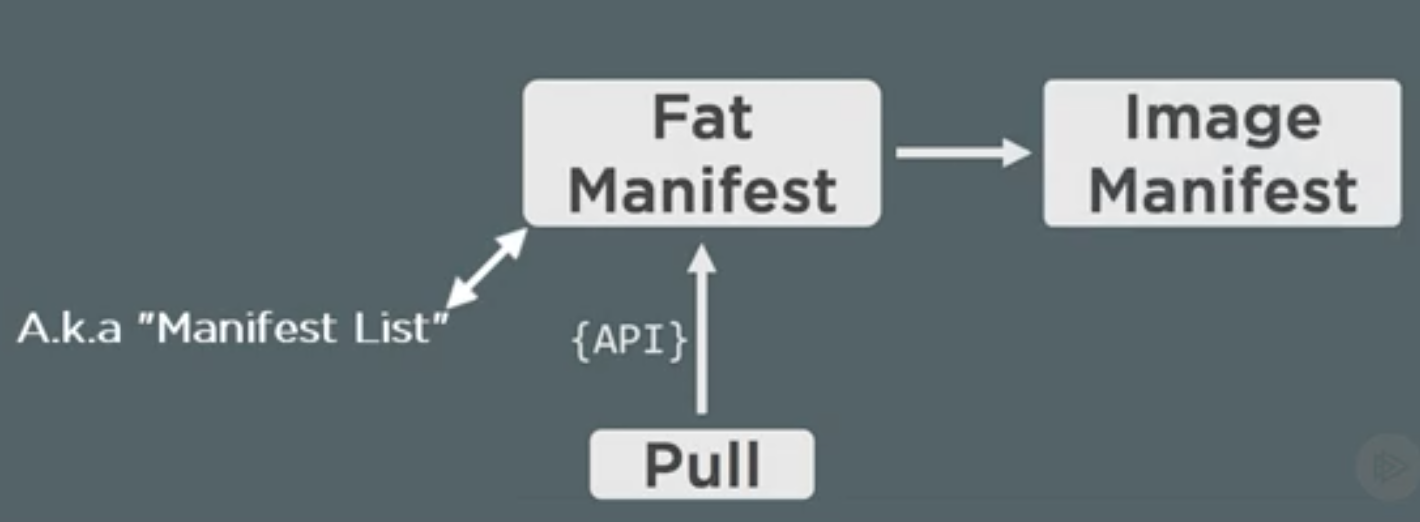
- Image pulling from registry is a two step process. Client makes a REST API call to docker daemon and then it daemon performs following steps:
- Pull the manifest
- Pull the image layers as listed by the manifest.
- Also, pulling the manifest is a two step process:
- First perform a lookup in a fat manifest (list of manifests) and find the architecture for which the image is to be pulled.
- If the OS architecture (x86, ARM, etc.) is listed in fat manifest, it will point to the image manifest for that particular architecture.
- Content Addressable Storage: To ensure the security and make sure the image being pulled is the exact same as what was requested for, the hashes of all the layers are stored in manifest file and the hash of this file is used as an image ID. So when an image is pulled, the hash is calculated and matched with the original hash.
How image layering works?
- There is a base layer, having all the OS related files like ubuntu. Even if the image has Ubuntu OS, the container of this image can run on any linux hosts like CentOS. The next layer can be the application code files and so on.
-
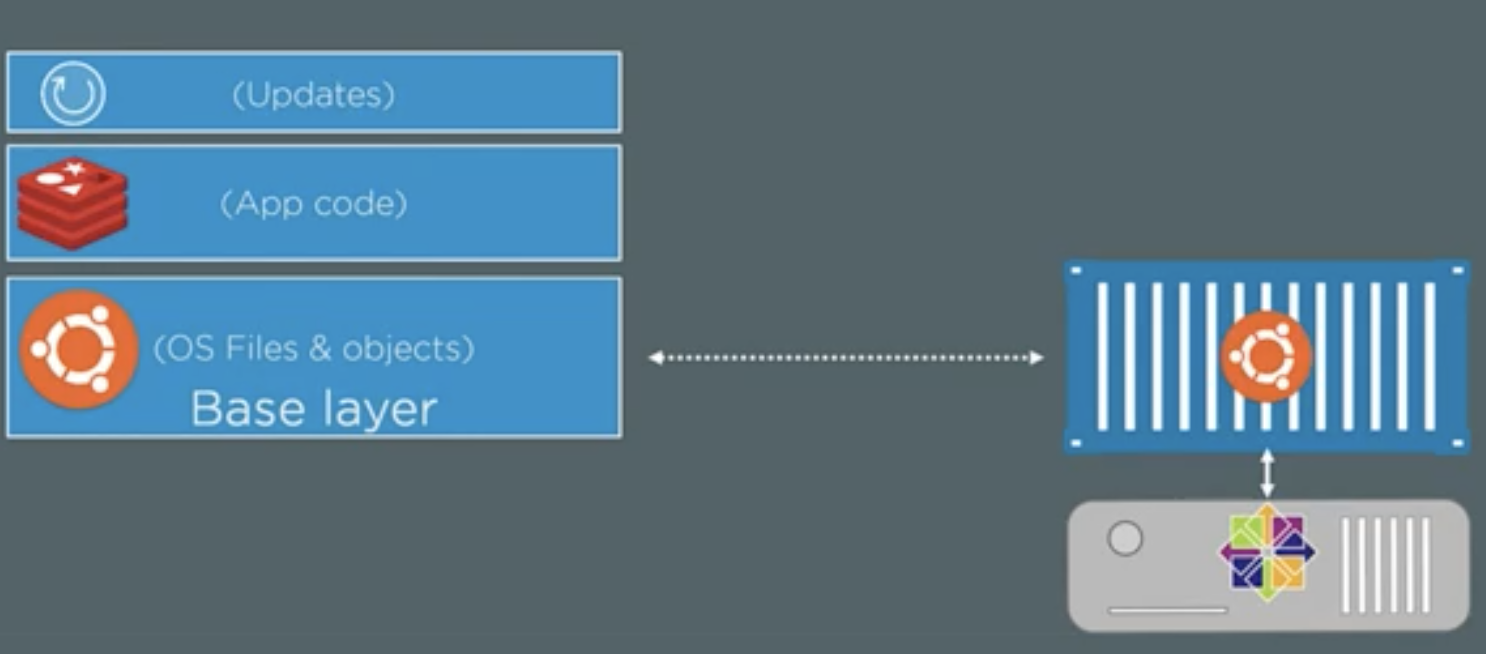
- The above image shows the different layers and also shows that the Ubuntu based container is running on the CentOS kernel of the host machine.
- There is also an storage driver (AuFS), which manages these layers and makes us feel that the image is a single blob instead of a bunch of layers.
- Each layer is stored as a directory on the host machine at the following location “/var/lib/docker/
(aufs in our case)/diff” (which is a local docker registry). - To get the history of how the images and its layers were built, use following command: docker history
- When the docker image is built, some of the actions add new things (like setting environment variables, exposing network ports etc.) to the image’s manifest(config file) and some of the things add new things to the image and therefore creates a new layer in the image.
- To view the manifest JSON file of the image, here is the command: docker image inspect
- To delete the particular image, here is the command: docker image rm
Docker Registries (Where images live)
- Docker registries can be both on cloud and on prem. There is a default registry called docker-hub. You can have your own on prem registries using Docker Trusted Registries (DTR), which comes with docker enterprise edition.
- There are two types of images on docker hub: Official images and unofficial images.
-
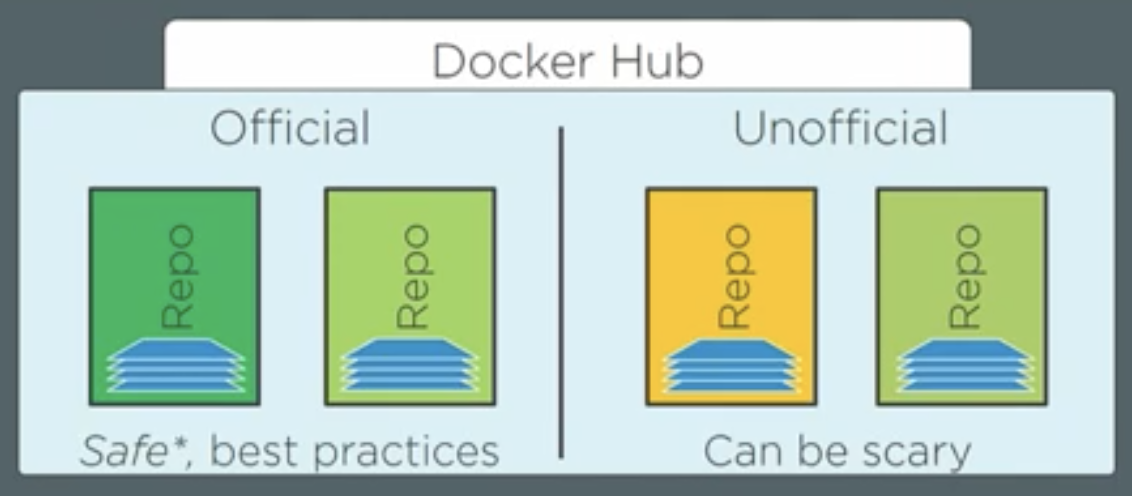
- Official images are at the top of the docker hub namespace, so that we can address them as docker.io/ubuntu. Docker’s default registry is docker hub, so if you are pulling the image from docker hub, you can also get rid of “docker.io/” from the name and directly run the command “docker pull ubuntu”.
- But this is somewhat misleading. The first part of the image name is registry name (like docker.io, Google Container Registry etc.), now inside each registry, there are repos (repositories) and in each repo, there are images (with name or tags like latest or some version number like 2.4.1).
- Therefore in the case of command “docker pull redis”, the name “redis” is the repo name. Note that we haven’t given the registry name and the image tag (or name) in the command. So by default docker takes docker-hub as default registry (docker.io) and “latest” as default image name (or tag). So the actual command would be “docker pull docker.io/redis:latest”.
-
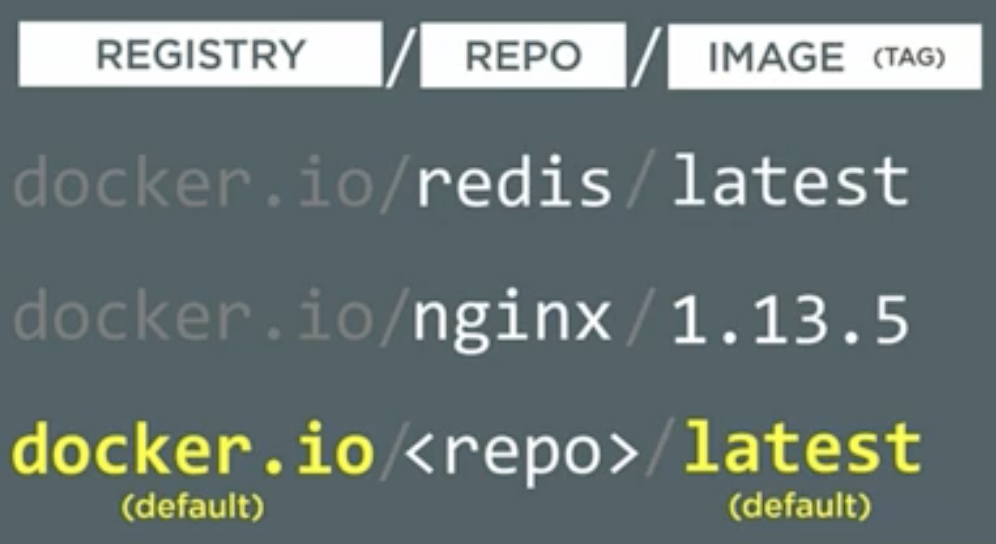
- While pulling the image, if the tag is not specified, it will be added as “latest” by default but while pushing the image to hub, it doesn't add the tag “latest” to the pushed images by default. It’s manual and that means the image with the tag/name latest might not be the “latest” image.
- Unofficial images are under username/organization name like “docker.io/kaushal28:latest”.
- For each layer, there are two types of hashes, first one is content hashes, which are calculated before compressing the layers and the other one is distribution hashes, which are calculated after compression of the layers (When images are pushed to registries, they are compressed).
- A good reference for image tagging: https://www.techrepublic.com/article/how-to-use-docker-tags-to-add-version-control-to-images/
Containerizing an Application
- To containerize any application, we use “Dockerfile”, generally placed at the root level directory of your application.
- Dockerfile contains the instructions for building the images
- Instructions are written in UPPERCASE
- All instructions are generally in
pairs - FROM =
is always the first instruction - It’s a good practice to list the maintainer using LABEL instruction
- RUN instruction executes the command in container and creates a new layer in image
- Use COPY instruction to copy your application code into the image as a new layer
- Some instructions add metadata instead of creating new layers (for example, exposing a port).
- ENTRYPOINT is used to specify the entry point of your application (in a python based application, it can be python3 src/main.py).
- The instructions of the docker file will be read by the “docker build” command, from top to bottom and one at a time.
- Here is a sample Dockerfile for a Python based application:
-
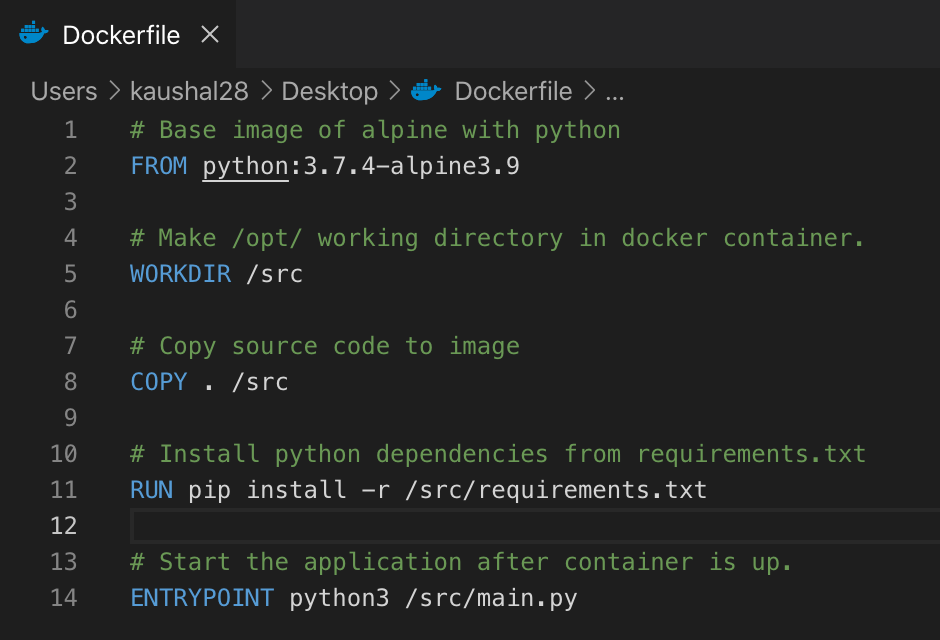
- Once the Dockerfile is created, we can build the image using the following command: “docker build -t image_tag .”. This command builds a new image with the tag “image_tag” and uses the source code from the current directory (given as a “.” in the command) to build the image.
- Here, in above command, we specified the current directory as the location of the application source code. Which is also known as build context. In build context, only include your code as the entire build context will be sent to docker daemon and if the docker daemon is remote and there are unnecessary files in build context, the resources will be wasted.
- Build context can be a remote GIT repository
-
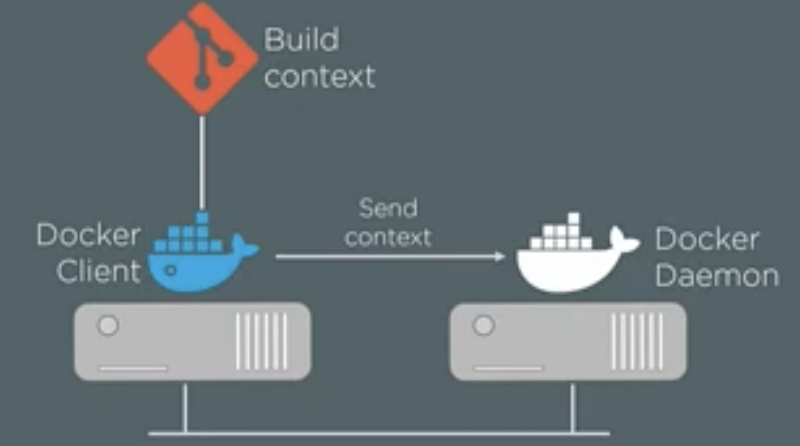
- To use the build context from GIT repo, use this command: “docker build -t
”. - Each instruction which creates a new layer, creates a temporary container, which in turn creates the layer and then the temporary container is discarded.
Multi-stage Builds (because size of images matters)
- We need to make our docker image as small as possible for faster downloads, lesser surface attacks etc. For that, we need to write our Dockerfile in such a way that it minimizes the space usage by minimizing the number of layers in the image and without multistage docker images, it is cumbersome. Refer this blog post for complete details:
- https://blog.alexellis.io/mutli-stage-docker-builds/ (best one)
- https://stackoverflow.com/questions/33322103/multiple-froms-what-it-means
- https://blog.bitsrc.io/a-guide-to-docker-multi-stage-builds-206e8f31aeb8
Working with Docker Containers
- Smallest atomic unit in docker is a container (VM in virtualization word, pod in Kubernetes etc.). If we want to roll out an app using docker, we do it using one or more containers.
- Images are read only and containers are these read only image layers + a thin writable layer.
-

- If any container wants to change the image file, it can’t directly change it in the image as the image is read only, instead it makes a copy of that layer into its writable layer and then writes the changes.
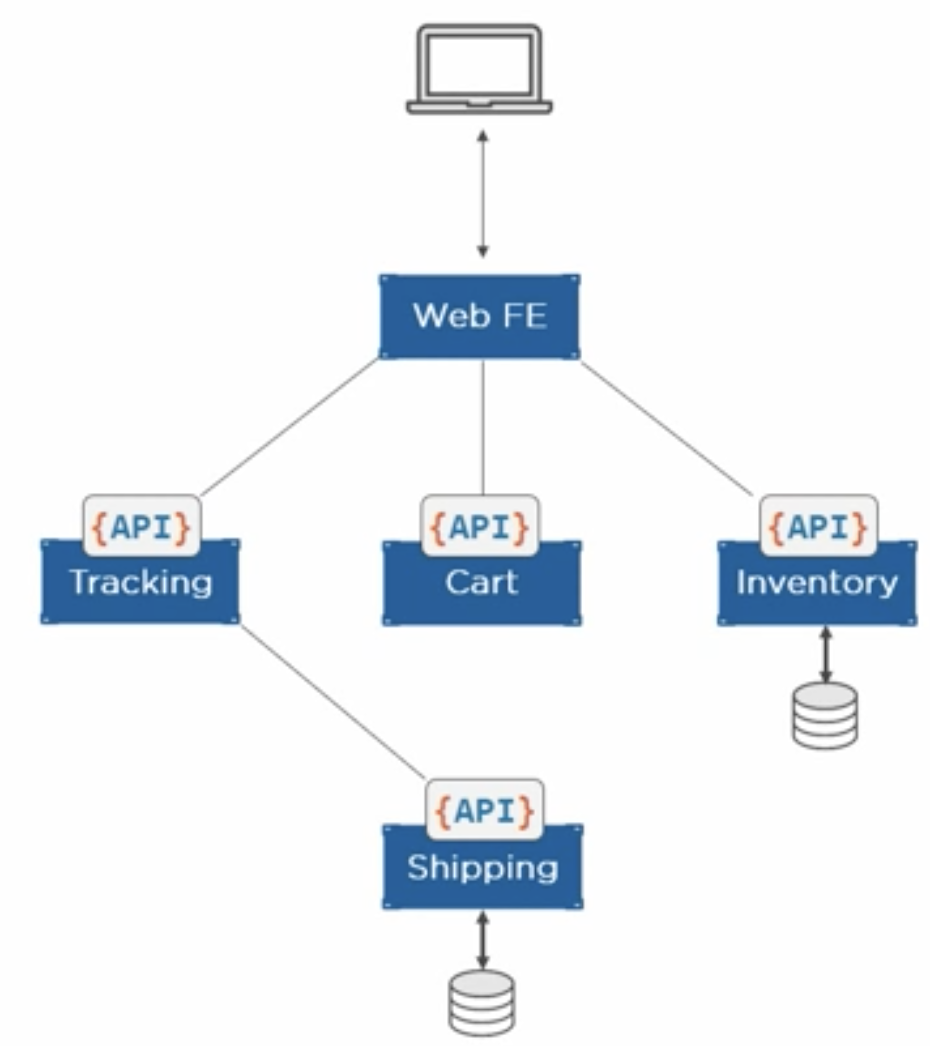
- Containers are used in microservices. Each microservice has its own container doing only a single job and communication between the containers is managed by APIs. Here is an example of such microservice architecture:
-
- When the container is stopped, its data/state is saved and when they are started again, it has all the saved data and states. So stopping and restarting does not affect any of its data.
Docker logging
There are two types of logs:
- Daemon logs
- Container logs (logs of application running in the container)
Daemon logs:
In linux with systemd, the daemon logs are sent to journald and we can read them using journalctl -u docker.service and the systems without systemd, the daemon logs can be found at “/var/log/messages”
Container Logs:
The application to be run in a container should be designed such that it runs as PID1 and issues the logs to stdout and stderr. If the logs are being issued into a file, files can be linked to stdout and stderr. Another approach is to mount a host volume to the docker container so that the logs/files persist even if the generating container is discarded.
Also in the latest docker versions (Enterprise Edition), logging drivers are supported. These drivers integrate the container logging with the already existing logging solutions like Syslog, Splunk, FluentD etc.
We can set the default logging driver for the container from the “daemon.json” file. With this approach, it’s easy to access the container logs using command “docker logs
Useful Commands and their details
- docker version: To get the version of docker client and server with other details like OS, build etc.
- docker info: Gives info about started/stopped/running containers, version information etc.
- docker pull “image_name”: To pull/download the image from docker hub to host
- docker run “image_name”: To spin up a new container
- Some variation which is used frequently: docker run -d --name web -p 80:8080 namespace/image_name: This means run a new container in detached mode (in background) with name “web”, map the host port 80 to container’s port 8080 and the image to be used to create a container should be from the namespace “namespace” and the name of the image should be “image_name”.
- Instead of detaching the container in background, if you want to interact with it, use following command: docker run -it --name “container_name” ubuntu:latest /bin/bash
- If the container is already running, you can use the following command to get into it: docker exec -it
/bin/bash - If we only want to run a few commands in the running container, then instead of getting interactive session from a running container, we can directly execute the commands using following command: docker exec
- To exit from the container’s bash, don’t type “exit” as it will end the bash process the leave the container with no processes running and therefore the container will be exited (killed). Instead press Ctrl P + Q. This will keep running the container. If there are multiple processes other than bash, it’s okay to type “exit” and the container would be still in running state.
- To get the list of port mappings for a container, use following command: docker port
- docker ps: To see running containers. Include “-a” to also include the list of exited containers.
- docker images: To view the locally stored docker images on docker host
- docker stop container_name: Stop the container with name “container_name”
- How to stop all the containers? (Even the containers which are exited): docker stop $(docker ps -aq): This means run the docker stop command against the output of the docker ps command. Now the arguments to docker ps means list all the containers even if they are exited and do it quietly (only output their IDs).
- Now to remove all the containers: docker rm $(docker ps -aq)
- To remove all the images: docker rmi $(docker images -q)
- Difference between docker stop and docker rm: https://stackoverflow.com/questions/33362856/whats-the-difference-between-docker-stop-and-docker-rm